Users:HowToUseCarat/InstallationWindows
(→IDE) |
|||
| Line 17: | Line 17: | ||
== IDE == | == IDE == | ||
| − | The IDE of choice is Microsoft Visual Studio 2015 Community. | + | The IDE of choice is Microsoft Visual Studio 2015 Community. Furthermore, the setup with Microsoft Visual Studio 2017 Community is similar. |
* Download it from https://www.microsoft.com/de-DE/download/details.aspx?id=48146 | * Download it from https://www.microsoft.com/de-DE/download/details.aspx?id=48146 | ||
Revision as of 12:39, 12 September 2017
This page shows how Carat++ can be compiled under a Windows environment.
- Windows 10 64bit
- Microsoft Visual Studio 2015
- TODO git/svn
- CMake 3.8.0
- Boost 1.63.0
- MKL (Intel MKL 2017)
Contents |
Windows Version
In this installation guide Windows 10 64bit is used.
Carat++ installation was tested also under the following Windows versions:
- Windows 7 64bit
- TODO please add more if you tested it there
IDE
The IDE of choice is Microsoft Visual Studio 2015 Community. Furthermore, the setup with Microsoft Visual Studio 2017 Community is similar.
- Download it from https://www.microsoft.com/de-DE/download/details.aspx?id=48146
- In Visual Studio 2015, Visual C++ is not installed by default. When installing, be sure to choose Custom installation and then choose the C++ components you require.
- If Visual Studio 2015 is already installed, choose File | New | Project | C++ and you will be prompted to install the necessary components.
//TODO Screenshots
Settings for Visual Studio:
- Text-editor -> C/C++ -> Tabstopps:
- Indent: Intelligent
- Tabstopp size: 2
- Indent size: 2
- Insert spaces
Git
Git is used as version control system. It is needed to download the Carat++ source code.
TODO
Get the source code
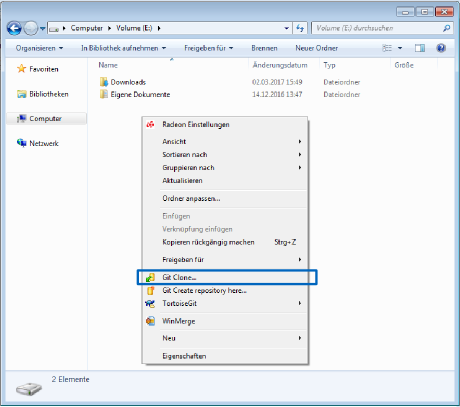
- Navigate to the folder where you want to have the source code.
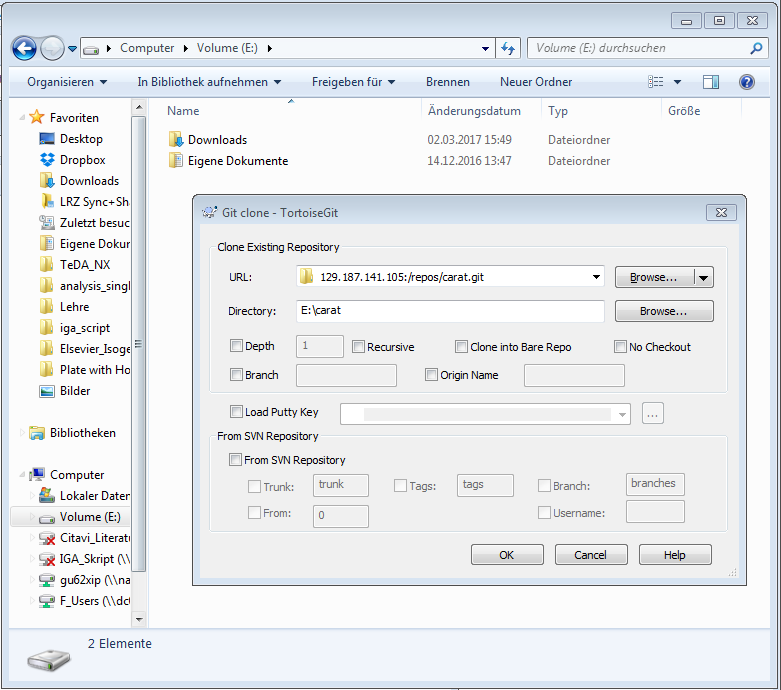
- Right click -> Git Clone...
- Enter the URL: 129.187.141.105:/repos/carat.git
- Click OK.
- Enter your trac-username and -password.
Create directory for build and libraries
In "C:\carat\" create the empty directories "libs" and "build".
CMake
Install the latest CMake version
Boost
Get the boost library version 1.63.0 from https://boost.org. Download and unpack it. Copy the unpacked folder with the version number into the "carat/libs" directory.
In order to use the Boost logging, it needs to be compiled:
- Open the Windwos command prompt.
- Navigate to the "carat/libs/boost_1_63_0 directory.
- Compile boost with the following lines in the command prompt.
bootstrap

b2 link=shared address-model=64 runtime-link=shared --with-atomic --with-chrono --with-date_time --with-filesystem --with-log --with-system --with-thread

b2 link=static address-model=64 runtime-link=static --with-atomic --with-chrono --with-date_time --with-filesystem --with-log --with-system --with-thread
If there is an error command "cl" missing, refer to the IDE section above.
- Now add the following path to the compiled boost libraries to your environmental variable "Path":
C:\carat\libs\boost_1_63_0\stage\lib\
MKL
Intel MKL is a equation solving library, that is strongly recommended to use.
- Install the Intel mkl package located at "\\DC01\F_Users\TEMP\software\intel_suite\MKL_2017_standalone\windows" with default settings.
- Now add the following path to the compiled boost libraries to your environmental variable "Path":
C:\Program Files (x86)\IntelSWTools\compilers_and_libraries_2017\windows\redist\intel64\mkl\
RapidJSON
RapidJSON is a JSON parser and generator for C++. It is used to read a Carat Inputfile in JSON-format. This library is optional.
- Copy the library "rapidjson-master" from "\\DC01\F_Users\TEMP\software\Carat_libs" to your carat libraries.
Compile Carat
User Settings
First of all it is necessary to set some paths depending on where you stored the carat source and libs.
Navigate to the Carat++ source directory and make a copy of the "cmake_personal_input.template" to "cmake_personal_input.dat".
Do not modify the "cmake_personal_input.template"!
In the "cmake_personal_input.dat" file you find the following part with commented lines where you have to set your user defined paths:
#==============================
# set directory paths
#==============================

# BASIC INSTALLATION

#set(CARAT_ROOT "C:/carat")
#set(LIB_BOOST_INCLUDE_DIR "C:/carat/libs/boost_1_55_0")
#set(LIB_BOOST_DIR "C:/carat/libs/boost_1_55_0/boost")
#set(LIB_MKL_DIR "C:/Program Files (x86)/Intel/Composer XE 2011 SP1/mkl")
With the paths used in this installation guide the block should look like (don't forget to remove the #):
#==============================
# set directories paths
#==============================

# BASIC INSTALLATION

set(CARAT_ROOT "~/software/carat")
set(LIB_BOOST_INCLUDE_DIR "C:/carat/libs/boost_1_63_0")
set(LIB_BOOST_DIR "C:/carat/libs/boost_1_63_0/stage/lib")
set(LIB_MKL_DIR "C:/Program Files (x86)/IntelSWTools/compilers_and_libraries_2017/windows/mkl")
Make sure to use a "/" as a separator in the paths.
Create the project with CMake
TODO add pictures (already created)
- Open CMake
- Set the carat source path: "C:/carat/src"
- Set the carat build directory: "C:/carat/build" (create this folder if it does not exist)
- Click "Configure"
- Select Visual Studio 2015
- Check the desired Flags (for the basic setup you can use the default values as you see in the sreenshot below)
- Click "Generate
Open the Carat++ project with Visual Studio 2015
Now you can open the Carat++ Project with Visual Studio 2015 and edit/compile it.
- Open Visual Studio 2015
- Click "Open Project..." and select the "C:/Carat/build/Carat++.sln" project file.
- Right-click the "carat" module in the project explorer on the right and "Set StartUp Projects".
Now you are ready to compile Carat++!
Compile
Benchmarks
After each build or at least before a git commit the benchmarks have to be tested.
- Compile "carat_benchmark"
- RUN_TEST
You should add a benchmark for every development. Therefore you can add two types of benchmarks in the folder example/benchmark_examples/:
- cbm_myfile1.dat: This benchmark is executed in every RUN_TESTS. The runtime should be short ( < 1s)
- xcbm_myfile1.dat: This benchmark is only executed in RUN_TESTS, if the flag EXTENSIVE_BENCHMARKS.
In addition, you have to provide a reference file with the correct solution in a file called ref_myfile1.dat.
Result "Displacement" "Load Case" 0 Vector OnNodes
Values
  79  -1.1022632867e+000  -9.8466095193e-001  -1.3132351571e-001
  83  -1.1400399584e+000  -1.1658915870e+000  -9.1812530586e-002
| Whos here now: Members 0 Guests 0 Bots & Crawlers 1 |

